Web excursions brought to you in partnership with MindMeister, the best collaborative mind mapping software out there.
I’ve been building out my video lighting setup lately. In addition to purchasing a few items, I’ve been researching DIY solutions to save (a significant amount of) money. Here are some of my favorite solutions that I’ve found thus far.
I often close the comments on the web excursions posts, but if you have some to add to this list, I’m leaving them open on this one!
A DIY white balance card that’s so cheap it’s practically disposable. The easiest of all the builds, and one you might even have all the materials for already.
This is the most involved build in this bunch, and I haven’t pulled it off yet, but the results look amazing. Adjustable brightness and temperature, diffusion, and 180° coverage.
There are a gazillion different tutorials on DIY bounce boards, but it’s all the same concept. A white board and a foil board. It’s not rocket science, but it’s an indispensible part of a lighting setup for both photo and video.
A fairly simple build and a valuable addition to your lighting rig. I purchased a ring light with adjustable color temperature, which I appreciate, but for most purposes this version would be significantly cheaper and cover all the bases.
The project link for this one is 404, but you can see enough in the build photos to understand the simple concept behind this one. Directional lighting using cheap under-cabinet lights from the hardware store and a bit of foam core.
Happy Valentine’s Day, and a big thanks to TextExpander for sponsoring BrettTerpstra.com this week!
Copy and paste is an inefficient way to keep track of the things you type over and over. TextExpander makes you more productive by taking care of all those words and phrases for you, putting them at the tip of your fingers with short abbreviations.
TextExpander works in all your apps so you can use it everywhere, like your favorite email app, text editor, Microsoft Word and Excel, Adobe Illustrator and InDesign, and Apple’s Pages.
All of your snippets are everywhere, on all of your devices. TextExpander updates new and edited snippets between your Mac, iPhone, iPad, and Windows PC instantly.
Spend less time typing and more time doing what you really want. TextExpander even offers free snippet groups for job recruiters, freelancers, airport codes, brand names, and more at the TextExpander website.
You don’t have to work alone: TextExpander for Teams lets you manage and share snippets with your coworkers or entire company.
BrettTerpstra.com readers get 20% off their first year: visit textexpander.com/podcast to learn more about TextExpander.
I’ve written for a variety of publications over my career. TUAW, Macworld, MacStories, and Lifehacker, to name a few. The vast majority of my writing happens right here in my own little world, though.
On my personal blog(s), I’ve had the opportunity to build an audience that’s here just for me. My regular readers know me, my sense of humor, and my style of writing. Hopefully you trust me, because I’ve worked hard for that. Even when my readers can’t see it, I blog with a code of ethics that I internalized early on. I don’t take money for reviews, I clearly state when posts are sponsored, if I use a review code or accept a review unit for a product and continue using it, I purchase it. I’m open and honest, often vulnerable, and am generally rewarded for it. It’s a pleasure writing for all of you.
When you write on bigger sites, you usually become just one of many bylines. In most cases, you don’t have the wiggle room afforded by reputation, and there are typically more eyeballs on everything you write. Basic math says that means more rude people, as small a segment as they may be.
The comments are often unforgiving. My first post that wasn’t on my own blog was on TUAW (The Unofficial Apple Weblog) back in the early 2000s. It got an irate comment. I think it was over a grammatical error that led a commenter to declare that I was an “idiot who shouldn’t be allowed to write” for a large publication. It hit me hard; I lost a bit of sleep over that one.
So I developed much thicker skin over the years. I learned that in the din of the larger blogs people have outsized reactions because they don’t think anyone notices a rational one. And the people who leave scathing personal attacks in comments are people who really want to be noticed.
These days I can take a correction and say thank you, even if it’s presented as a personal attack. I can handle someone who disagrees, no matter how vociferously they feel the need to state it. There’s one type of comment that still gets me though: one that impugns my integrity.
I got a comment on one of the bigger blogs recently that accused me — in an irate and self-righteous tone — of writing a paid advertisement for an app I was reviewing. If you read my posts here, you know that I don’t write negative reviews. If I don’t like something, I generally ignore it, preferring to focus my writing energy on things I think are worthwhile. And if I love something, I gush about it. But no money changes hands without being clearly stated, and reviews are never paid for. So it really gets under my skin when an accusation like that is made. I think I’m writing this post mostly to get that off my chest.
I sometimes wish that job résumés and Tinder profiles required an appendix of all of the comments a person has left on other’s work in the last year. You can learn a lot about a person from how they approach offering criticism when it’s not face to face.
I clearly have a personal motivation for this post (that probably doesn’t help prove my whole “I have thick skin” thing), but it speaks to some larger points:
If you’re going to write for large audiences, you’re going to be trashed and you have to be emotionally prepared for that. It’s inevitable and it will be overt. (And unfortunately, it’s significantly worse for women.)
There’s a code of ethics in blogging (and Instagramming and other “influencing”, as has been in the news of late). Stick with it. Reader trust is both vital and fickle. Don’t lose it.
Bloggers, remember that the loudest commenters are always the assholes. People who agree what you write by and large don’t feel the need to let you know. People who don’t, well, they’ll want to tell you and anyone else who might be listening. Just keep that in mind.
Lastly, for commenters, you don’t need to make anything a personal attack, ever. Take issue with a statement, point out a misstep, express a contrary opinion, but do it kindly. If someone is truly offensive to you at their core, you’re allowed to not read their work.
To summarize, I understand the risks of exposure and handle them, as most bloggers do. I’m simply urging ethical behavior by bloggers and influencers, and reiterating one point to all readers everywhere: it’s ok to be nice.
Daniel Jalkut is a popular fellow in the Mac coding community, and a bit of a personal hero to me. I enjoyed his backstory, originally written for the 512 Pixels members-only newsletter.
This is a great sound generator for work or sleep. Use sliders to set tone levels and then turn on the automation to have it shift over time for random soundtracks to fit your mood. Nicely done with web, Mac, and Windows versions as well.
I haven’t had a chance to test this out yet, but I love the idea of it and look forward to the excuse to try it. It’s a lot like Clarify was on the Mac, allowing you to turn images into step-by-step instructions quickly and easily. I have high hopes.
I’m really excited about Hook, the latest app from Luc Beaudoin (creator of MySleepButton). It makes it possible to link together documents, photos, notes, todo items, web pages and more. Instant access to every part of the project you’re working on from any file in that project. I wrote more about it over at Lifehacker, so I’ll point you there for more!
I mentioned Retrobatch a while back when it first went into public beta. After using it for a while now, I wanted to let you know that it’s worth grabbing and getting into. I’m pretty sure that if you’re one of the people it’s designed for, you’ll be happy to pay for it.
Retrobatch is a node-based image processor from Flying Meat, the creator of the acclaimed image editing app Acorn. It makes it easy to automate multi-step image processing, including scaling, resizing, cropping, converting, watermarking, metadata, and even things like color adjustment and PSD layer generation. You drag the steps together in a sequence on your workspace and save the result to run on any number of images at once.
I’ll note that the interface can get a bit frustrating when you get too many nodes in an area and the auto-connecting lines start misbehaving. I think that this is an area that will improve over the next few releases. Be sure to give yourself plenty of space to add in new node paths as you work. Beyond that, working in Retrobatch is quite pleasurable.
Update: I stupidly missed that you can turn off auto-snapping entirely in Preferences and draw connections with a CTRL-drag. That completely solves the above issue for me. Forget I said anything, unless you also missed that and have the same problem in which case, you’re welcome.
As one example, I use Retrobatch to prepare my header images from this blog to be used in various social media sharing platforms. I start with a template for the header design with markers showing me where square images will crop, the sizes I’ll need to match for Facebook open graph images, etc. Once I’ve finished designing in the template, I output a single JPEG or PNG file and run it through my “OpenGraph” Retrobatch sequence:
Create a square crop and resize it for use on Twitter cards
Crop and resize a Facebook/Large Twitter Card image
Create the @1x and @2x versions for my own blog
Process all of these through ImageOptim
I won’t share the template and Retrobatch file here as it’s pretty specific to my needs, but I’d be more than happy to offer them as examples to anyone who asks.
Like I said, if the above example reminds you of any image processing you do on a regular basis, you should definitely check out Retrobatch. It won’t take long to see all of the possibilities it offers! Retrobatch has a standard version for $29.99 US, and a Pro version for $49.99.
Since that one time that I wrote a review of the Ultimate Hacking Keyboard for you nerds, I’ve only come to love my UHK more. I’m officially a mechanical keyboard guy at this point. Much like the right band can ease me into a whole genre of music I hadn’t previously appreciated, it’s turned me on to all kinds of mechanical keyboards and related pursuits I just couldn’t get into before.
I love my UHK enough that I decided to show it some custom keycap love. I had a custom set of translucent black, side-printed keys that I’d picked up from Massdrop for my Ergodox keyboard. So I swapped those in. I had a set of red keys for — I don’t remember what, and replaced the IJKL keys (which are arrow keys on my UHK) and the Caps Lock key (my Hyper key) for fun. But those weren’t side printed and the font was ugly. And so began the journey.
Max Keyboard
I went through a few vendors before I got to Max Keyboard. Turns out it was the same company that provided my original set of side-printed caps from that Massdrop drop. They offer a custom keycap set with a little picker where you can customize the plastic and printed text color of every key and get the whole set in the mail for $40 (or $20 for blank keycaps).
For many keyboards this would be enough for a great custom keycap set, but among the problems I ran into was that the UHK has a unique layout for modifiers on the right. The Return, Shift, and Control (as well as Backspace) on the right side are all non-standard widths, so the custom key set didn’t give me full coverage.
Because I’d messed up with purple text on carbon grey keys for the bottom modifier row, which turned out to be unreadable, I just ordered a second set with new colors on everything but the left modifiers, which covered my right shift key and gave me a few more options for the rest of the keys. Even then, I needed an extra function key, a non-standard-width pipe key, and a few other anomalies. With great hope I entered those requirements in the comment box of my order and, lo and behold, they accommodated every request at no extra charge.
In the same order I discovered that you can also order single keys with custom artwork side or top printed on any color keycap. I used that to get my own Return symbol on a purple key, and am eagerly awaiting shipment of my custom Backspace key and a Hyper key with a rocket ship symbol. I’m sure you’ll see pictures of those on Twitter or Instagram…
The only keys I’m having trouble working with are the Space/Mod keys on the keyboard, which I’d love to color but would be happy with just blank versions. Unfortunately, RX4 1x1.75 keys aren’t the easiest things to track down. It’s also hard to find a R4 1x2.25, so the angle on my right-side CTRL key is a bit off. This paragraph is probably already too nerdy for all but the most hardcore keyboard folks. I’ll stop.
The level of service and willingness to help me with overly custom orders leads me to highly recommend Max Keyboards for all of your keyboard customizing needs. That’s really the point of this whole post. Go buy stuff from Max Keyboard.
The Keybow
As an aside to this post, I’ve been having a lot of fun with the Keybow from Pimoroni. It’s a solderless 12-key Arduino keyboard project you can assemble with just a screwdriver (and maybe a spudger), then program with Lua and a micro-SD card. It took me a bit to get it up and running, but it was a great host to the Fn row from my first set of custom keycaps that hadn’t previously found a home (all the keyboards I’ve ever customized were 60%…).
You can program the LEDs using a 1 x 12px PNG file, with each pixel representing an RGB color. Load that into the SD card and watch it light up. Add a few more columns of colors and it will start cycling. You can also manually assign colors in the config files, and have keys change their color when you press them (and other fun tricks).
You can have the keys send whatever codes you want. I have it sending CTRL-Shift-F1 through F12, shortcuts unused elsewhere on my system that allow me to trigger anything I want via BetterTouchTool. I have a fun system set up where double tapping a key1 launches one app, but then a sequence combining one of the three bottom keys with any of the top nine performs alternate functions. Sure, I’m making another beast out of it that’s going to require a printed chart to use, but I’m having fun. Let me be.
Anyway, go check out Max Keyboards, the Ultimate Hacking Keyboard, and the Keybow (and the other fun Arduino kits from Pimoroni). Join Massdrop (my referral link) for great custom keyboard/keycap buys, and obviously check out /r/MechanicalKeyboards for that keyboard pr0n. If you’re into that kind of thing, of course. Which apparently I am now.
Did you know that BetterTouchTool can use key sequences as triggers now? It’s awesome. You can also chain together multiple actions in response to triggers. Have fun with that.↩
I think brainstorming is one of my favorite activities. While some of my brainstorming leads to making cool things, I have piles of mind maps for ideas I’ve never started working on, probably never will, and that doesn’t bother me at all. I enjoy the process, and I love having the trove of inspiration.
I use mind maps for planning out writing projects, making decisions, even sharing ideas. I once submitted a mind map instead of the requested “time boxing” when I worked a corporate job and it ended up being sent up the chain and I received compliments from the top on the “ingenious presentation.” But what I most often find myself mind mapping is ideas for software or other projects I want to tackle.
I’m not a project manager by any stretch of the imagination. I do have a working system for brainstorming, though, and I’m happy to share it with you. What follows isn’t a professional study on brainstorming, it’s simply the method that has arisen from a couple decades of doing this. It’s a starting point for all of my brainstorms. Every project has its own needs and the framework adjusts based on the context, but it always starts with the same basics.
I prefer brainstorming in a mind map because the process is not at all sequential for me, and the way I develop a mind map works with that. I might be thinking about a feature I’d like for an app, but at the same time pondering questions I have about an implementation of something else entirely. With a mind map I can start pouring those thoughts out in any order, organizing them on the fly, and constantly freeing up more space for new ideas. A lot of times a finer point or possible solution to an earlier thought comes up while I’m brainstorming an ostensibly separate part of the project, and a mind map makes it easy to drop it where it needs to go.
The Tools
I’ll mention my favorite apps for mind mapping before I get rolling. The app I use most often is iThoughtsX, available on Mac and iOS. iThoughtsX offers all of the things I like: great keyboard navigation, map balancing an auto-coloring, images, icons, notes, task management, search and filter, presentation mode, great Markdown export, and easy integration with Marked 2 (among many other features). On iOS you’ll find it in the App Store, and on Mac you can find it available for direct purchase from toketaWare as well as through Setapp (in addition to the Mac App Store).
MindMeister is my second most-used mapping tool. It’s a web app with an iOS companion. It’s full-featured and a delight to use, but its most obvious draw for me is its collaboration capabilities. Live mind mapping with other people, with full attribution and history features. And you can easily convert a mind map into a kanban board in MeisterTask, MeisterLabs’ other major product. It also features one of the coolest presentation modes of all time.
Though I often show it less love, I also have great appreciation for MindNode, available on Mac and iOS. It’s a bit prettier than the competition, they’ve continually expanded its feature set, and it works with Marked 2 as well. If you’re comparing options, it’s a top contender.
Ok, so I’ll let you choose your weapon and we’ll move on to my project brainstorming method.
The System
As I said earlier, the reason I do this in a mind map is I can be adding to all of these parts simultaneously in way that makes the most sense to me. You could pull it off in an outline just as easily, if that works better for you.
I start with a map where the central node is a name for the project. It might be “notes app” or “solving world hunger,” just a general topic for the session. I then add five top-level nodes off of that: Problem, Requirements, Barriers, Questions, and Plan.
Top Tier Sections
Problem(s)
This usually only has one child node. It’s basically a thesis statement, succinctly summarizing the overarching problem that I want to solve. That may have sibling nodes if it’s multi-pronged, or child nodes if I need to expand on details.
As an aside, I usually only write full sentences in the last node/topic in a chain. A string of nodes represents a train of thought for me, and if the train ends up leading to a destination, great, otherwise I keep the topics as brief as possible, four words at most.
Requirements
How should the project solve this problem? This is not a list of steps—that comes later—but rather a description of what the final product should be. In the case of an app, this describes the final product’s attributes, minimum viable product features, and/or things it must do for me to consider it successful.
Not every topic in this section is actually required. It will often have a subsection of “optional” features or nice-to-haves that will likely come up as I follow trains of thought in the other sections.
This section is the most pure “brainstorming” part of the process. Ideas about what could work, what could be, what I’d like to see. I separate out the barriers and questions that come up so that they’re easier to take action on.
Barriers
What are the biggest issues I’m going to run into while solving the main problem(s)? What complications can I predict coming up? Do I need to learn a new framework? Is there going to be something I’ll be dependent on someone else for? Are there legal issues I’ll need to understand and solve?
When it’s possible, my barriers have child nodes that detail possible solutions. I just list out everything I can think of at the time. I’ll sort them later.
Questions
As I brainstorm I will absolutely run into questions I can’t answer. These get collected here. If an item in the Barriers or Requirements sections leads to a question, I add it here and create a relationship arrow back to its origin. If a question gets answered in the process of brainstorming, its solution gets added to the original barrier or requirement, either as a child node or as a note on the topic, and the question gets marked as “answered,” usually with a green checkmark icon.
Plan
The plan section gets filled in as I go, but generally is the last section to populate. When a barrier has a confident solution or a requirement results in an obvious action step, that gets added to the plan. Once it’s as complete as it’s going to get, this is the section that usually gets turned into an OmniFocus or MeisterTask project.
Note that a plan doesn’t always have to be a list of action items. Sometimes I’m just brainstorming a decision I’m making, and the plan is more philosophical than it is anything I’m going to be sticking into OmniFocus. It might even just contain the final decision I made.
Using the System
Think Fast
I call the Requirements section what I do because it’s the easiest way for me to start the process. The question “what do I most need this to accomplish?” is one I usually know the answer to already, and a good place to start thinking. Not everything here is actually required, it’s simply the way my starter questions are usually prefixed. Knowing what I need from the final solution gets me thinking about all of the things I need, the things I want, and the things that could be, the problems and barriers that come with those things, and all the solutions that could exist.
I put it all into the map, every thought, the thoughts that leads to, the random and possibly stupid questions that come up. Unless I’m collaborating live, no one will ever see this first stage. It’s ok for it to be wrong.
So the brainstorming really starts in Requirements and continues in Barriers. Filling in those sections and brainstorming as deep as a topic needs to go leads to things that fill in Questions and Plan. I draw relationships where they’re appropriate, add notes when I have more to say than I think should be a node title, and use icons to sort and prioritize thoughts as I go.
Reviewing
When it comes time to review what I have, I start rearranging and doling out icons, tags, and labels. With barriers and questions I’ll put red flags on the ones that I haven’t solved, calling them out for further review. If I have a barrier with a list of possible solutions, I’ll do my best to sort them and label them. I’ll even delete obsolete ideas, though a mind map is a perfect place to store even “failed” trains of thought as seeds for other ideas. As this sorting happens, more items usually move into the Plan section.
Keep in mind that just because you’re reviewing doesn’t mean you aren’t still adding to the map. As I review thoughts I had early on in the process, it inevitably leads to new ideas or solutions that are now available through the filter of all of the other problem solving I’ve done. Reviewing happens when there’s a lull in the process, not a as a final step.
In the end I have a record. It might serve as a starting point for a completed project, or it might make me realize that an idea isn’t feasible right now. I have a couple of “master” maps for things like App Ideas and Projects where I add links to these individual brainstorms and sort them into sections like “planned” or “sky pie.” Each session becomes part of my compendium of ideas, and like I said at the start, I love having these records of all my crazy ideas.
Not the most affordable audio transcription service (10¢/min), but well-reviewed and very solid in my testing. There’s also an iOS app for recording meetings and lectures and getting timestamped transcripts within 10 minutes.
Basically a clone of Safari’s Reader View for Chrome. Works really well. Tip: you can select some text on the page before opening it to specify exactly what area to use, just in case the site’s design isn’t conducive to stripping out ads and other clutter.
An interesting Chrome extension that lets you create web scrapers with point and click to specify components of a page, then download results as a CSV after scraping multiple pages. Use it on 10 pages without signup, 1000 with registration, and even more with the premium plan.
Hopefully the majority of my readers can read the headline and not need further explanation, but just in case… my current temp of -49°F here in Minnesota does not negate the undeniable trend of global temperature rise. In fact, they’re probably closely related.
Memento Mori. This iOS app sends you notifications reminding you that eventually you’re going to die, and then offers you a random quote on death (and/or life, as the two are fairly entwined). My dark sense of humor and I find this delightful.
While Firefox has made very impressive strides, I still use Chrome as my primary browser. It’s due in no small part to the Workona extension, but that’s beside the point of this post. I wanted to talk about one of my favorite little productivity tips for Chrome that doesn’t require any extensions or hacks.
Custom search engines allow you to type an abbreviation, hit tab, then type a query to jump straight to the search results on just about any site that has a search tool (so just about any site).
Here’s a step-by-step for adding a time-saving search. As an example, I’ll show how to add a search for instantly finding the best literary quotes about a topic using the GoodReads quote search.
Setting up a custom search
Start by going to the site you’d like to get the results from and running a search (any search). Copy the URL that’s generated after the results are shown. Save that. It will look like:
Open Chrome preferences (use ⌘-comma like an adult). Scroll down to the Search Engine section and click on Manage Search Engines.
You’ll notice that Chrome has already saved a lot of searches you’ve run in the past. You can click the dots on the right side of any of these to edit the keyword to something short and access your previously-used searches conveniently.
To add your own custom search, click the Add button next to the Other search engines header.
Fill in the details…
Give your search a title (this will show up in the toolbar as “Search in [title]”). In this case I used “GoodReads Quotes.”
Choose the keyword that you’ll type to initiate the search. I used “quote.”
Now paste in the search url you copied in step 1, and change the portion of it that contains the search you ran originally to %s. That will be replaced with the text you enter in the URL bar at the time you call the custom search engine. In this case:
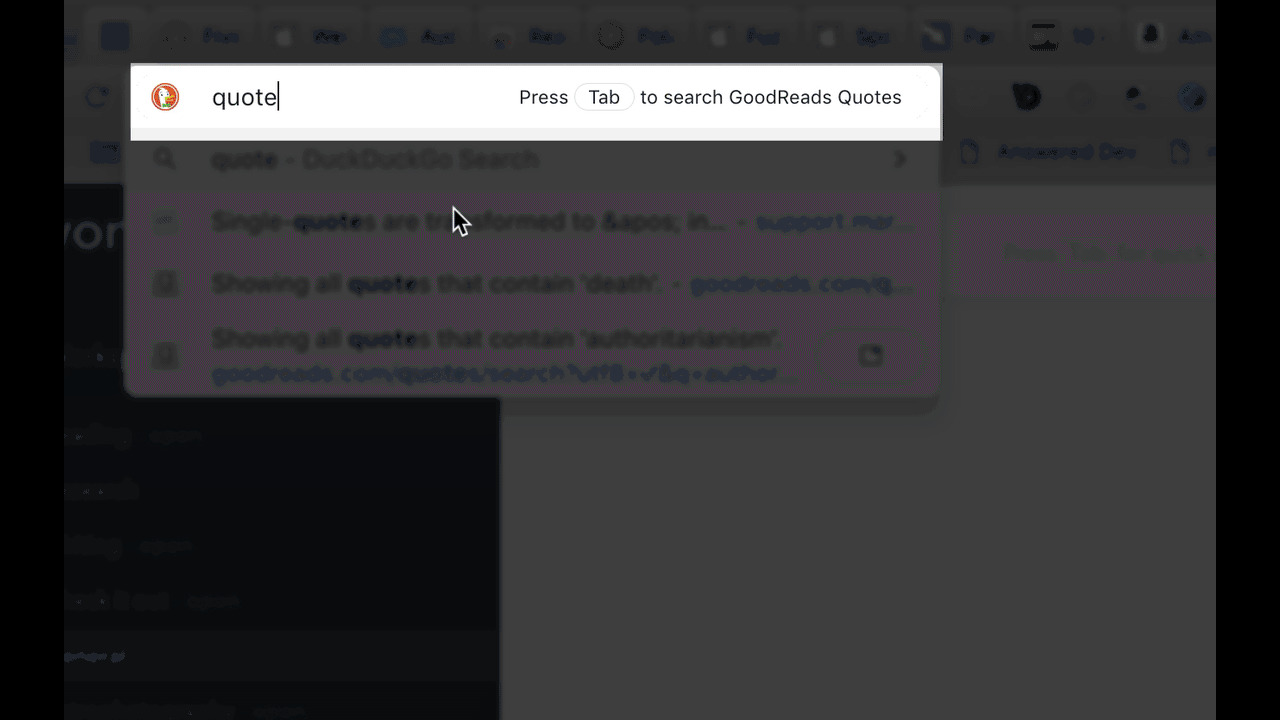
Now when you jump to the URL bar (again, use Cmd-L instead of clicking like an animal), you can just type “quote authoritarian” to search for quotes from your favorite writers.
“A reliable way to make people believe in falsehoods is frequent repetition, because familiarity is not easily distinguished from truth. Authoritarian institutions and marketers have always known this fact.”
— Daniel Kahneman, Thinking, Fast and Slow
Some of my favorite custom searches
I use the Adobe Stock Photos site quite a bit, so I created a custom search for stock [query] to run those quickly.
https://stock.adobe.com/search?k=%s
As I mentiond, I freqently use bt [query] to search my site using a DuckDuckGo site-specific search (in this case with a bunch of extra query settings).
In most cases you can just type a space instead of using Tab, so the simple act of typing “quote death” would automatically initiate the search.
If you didn’t mean to start a custom search, for example if you meant to send the word you typed to the default search engine, just hit backspace and it will restore the word and cancel the custom search.
You can also use custom search engines to create site-specific searches for DuckDuckGo or Google: for example, if I want to search my own posts using DuckDuckGo, I type “bt”, hit Tab, and then any keywords I need. This executes a site-specific search sorted by date with the URL https://duckduckgo.com/?q=%s&sites=brettterpstra.com&sort=date.
Got your own gems for Chrome, or want to talk about how you accomplish this on other browsers? Your comments are, as always, welcome below.